
Rockwell's Juicy Bird - Rec1pe.2
It's 2022. No one should be eating a dry ass turkey anymore. So here's the beans.
There is essentially only ONE thing you need to do to prevent your turkey from being "dry", which is cooking it at LOW HEAT. Everything else is either a cherry on top to make it even juicier (brining) or nonsense (wEtTinG thE turkEy perIOdiCallY). For those of us that are somewhat competent at googling, the actual tricky/somewhat controversial aspect is to get the outside crispy WHILE the inside remains juicy. And so without further ado, I'll share the steps I take to ensure this outcome while also giving some speculative tips on how I think this process can be even better.
1. Brining the Turkey
Brine every time! The only reason I don't always brine my turkey is because of time. Most thanksgivings (as of late) consists of me arriving to my parent's house the morning of. When I DO have the opportunity to brine the turkey, I use this recipe from aspicyperspective (with some slight tweaks).
necessary stuff
1 gallon room temp/cold water (more as needed)
2 cups brown sugar
1 cup sea salt or koscher salt
optional stuff/room for creativity
3 shallots, roughly chopped
6 cloves garlic, smashed
2 tablespoons whole peppercorns (or 2 tablespoons of black pepper)
2 tablespoons fresh rosemary, roughly chopped
1 tablespoon fresh thyme
Remove the turkey's giblets then mix all the stuff together and throw it in a plastic bag along with the turkey to sit overnight in the fridge (you can go up to 48 hours). The most important part of the brine is the salt. Salt does two things when it gets into the turkey's muscle cells: it disrupts the muscle fibers (making it more tender), and it allows absorption of more water into the cells (making it juicier). A great summary of the process is written here. The brown sugar is also a functionally element of the brine (although I find weaker and scarcer evidence for this). It apparently helps with the taste and the browning of the skin.

2. Dry Rub / "Dry Brine"
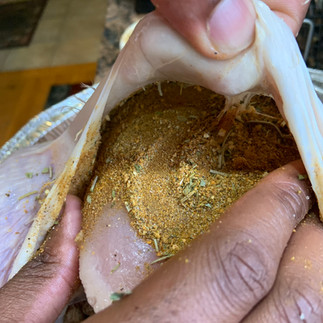
It doesn't really matter what dry rub you use, but there is evidence that it makes the turkey juicier via the same process as the "wet" brine. My primary reason for doing it (and I ALWAYS do it) is the taste. Because I'm a savant and genius at cooking (and not because I'm lazy and don't want to fuss over precise ingredients), I haphazardly throw a hodgepodge of spices together and it works every time ;). The ingredients I used for last year's turkey are shown below.
How much of each thing you ask? Who knows? I'll say one thing about the spice mixture (specifically for those that did not have time to do the wet brine). Salt is a key ingredient. It's not shown in the photo of ingredients below but it is necessary if you intend to use this as an actual brine. Otherwise, it's just a tasty dry rub.


And for those anxious formulaic people that NEED to have a recipe, the bare minimum "dry rub" is 1 tablespoon of salt for every 4 pounds of turkey. Just add spices to the salt, you can do it! If not, here is my favorite dry rub recipe:
1 tablespoon kosher salt if dry rub or 1 tablespoon kosher salt per 4 pounds bird if brine
1 tablespoon brown sugar
1 teaspoon paprika
1 teaspoon black pepper
1 1/2 teaspoons dried thyme
1 1/2 teaspoons dried rosemary
1 teaspoon dried sage
1/2 teaspoon garlic powder
1/2 teaspoon onion powder
Apply the rub
If you did a wet brine, remove bird from the bag and allow it to dry in the fridge for a few hours. If you didn't remove the turkey's giblets, rinse it, and proceed to step 2.
Pat the turkey so it is DRY.
Rub dry rub all over turkey. Make sure you get under the breast skin like I did in the third photo above!
Let turkey sit in the fridge (overnight if you didn't do the wet brine).
To be clear, If the turkey is already brined, you should just treat this as a tasty dry rub and you don't have to let the turkey sit in the fridge at all. BUT, if you did not brine the turkey and are USING this as a brine, then you should let the salted dried bird sit in the fridge as long as you can before proceeding to stuffing and roasting the turkey.
3. Stuffing (Recipe NOT INCLUDED)
Every year I do something different for the stuffing. Sometimes I even use the (queue horror music) PRE-MADE STUFFING. I'm not going to comment on what stuffing recipe is the best (toasted bread cubes with carrots, celery, onions, and "spices" wetted with melted butter yadada they're basically all the same), however I will comment on what stuffing does to the turkey in general. In short, it increases the cooking time of the turkey. I've heard whispers of stuffing interfering with the evenness of the cooking and I cannot confirm or deny this because in my hands it honestly does not matter. I will say that the BEST stuffing I've ever had was not shoved in a turkey but the best turkey I've ever had was stuffed 🤔.
Anyway choose the stuffing and stuff it... or not. This is post is about the JUICINESS not stuffing.

4. Roast'em
Yo turkey is so dry, it can light a grill in the rain.
Yo turkey is so dry, it needs vaseline to be consumed.
Yo turkey is SO DAMN DRY, it SHARPENS the knife when I try to cut it.
In all seriousness, turkey is roasted at 325F. If I had it my way and it wasn't for salmonella, turkey would be roasted at 200F, but that's a story for another day. There are several roasting tricks people will use to keep the turkey juicy all while getting the outside to be crispy. First let's get one thing out of the way. NO BASTING. Constantly opening the oven and throwing water over your turkey only to see it not penetrate the skin and roll down the side is a pathetic and desperate attempt to save a lost cause. We don't do that. Instead, we trust the brining process, we trust in the low roasting temperature, and we take an additional precaution by TENTING the turkey with aluminum foil. We do this towards the aim of cooking the turkey without drying it out.
Preheat oven to 325F
Placed brined, rubbed, stuffed/unstuffed turkey in a baking pan
Melt 8 tablespoons of unsalted butter to drizzle and massage over the top of the turkey.
Cut 4 more tablespoons of butter into little squares and stick them under the breasts of the bird
Loosely tent the turkey with aluminum foil
Put bird in oven and wait
The roasting time roughly depends on the size of the turkey.

The bird is done when the internal temperature reaches 165F. Insert a meat thermometer in the deepest part of the turkey (inner thigh angled deep within the breast) to check if it's done. The first time you should check the temperature is 1 hour before the estimated roasting time. remove the entire pan from the oven, close the oven to preserve the heat, check the temperature, and if it's not ready check again in 30 minutes. As SOON as the thermometer hits 165F, we UNCOVER THE TURKEY and move on to the next step!
5. Crispy Skin (Optional Glaze)
To crisp the skin, we raise the temperature of the oven to 425F. However, there's one more thing to consider, and that is the glossiness of the turkey. This is done using a glaze that we make in a separate sauce pan and brush over the turkey periodically.
Mix the following ingredients into a small bowl then add to a sauce pan on medium heat.
garlic cloves, crushed
1/3 cup low-sodium soy sauce
1/3 cup (packed) light brown sugar
1/3 cup sherry vinegar or red wine vinegar
6 Tbsp. neutral oil (such as vegetable, peanut, or canola)
Stir periodically until the sugar is melted.
Every five minutes, brush the glaze over the turkey's surface. This oily and soy-saucy glaze is designed to simultaneously crisp and shine the skin. In reality, the glaze is completely OPTIONAL as the heat alone should suffice to crisp the skin. Last thanksgiving I did NOT glaze the surface (I didn't have soy sauce or vinegar) but the skin was still very crispy! It typically takes 15-25 minutes to crisp the skin to a golden brown.
This step requires the most vigilance in the entire process. Be careful not to burn the skin. As SOON as the skin is crispy and brown, you want to remove the turkey from the oven to let it sit for thirty minutes. Your turkey is then ready to be carved!
A voila! Here it is (below). Now this was definitely not the prettiest turkey I've ever made (I'll make a picturesque one next thanksgiving to show off), BUT in terms of juiciness and crispiness, it's definitely a 10/10. Two omissions I left out were not buttering the skin and not adding the glaze, hence the matte finish.

But as you can see from the meat itself, it's juicy and tender.

But why take my word for it? Just listen to the reception from the completely unbiased family.
And of course it's an A+ from the pup!
In conclusion, brine your turkey, cover it in a dry rub and butter, cook it at low temp (tented with foil), uncover it and raise the heat at the end to crisp the skin! Glaze it to make it look pretty, or not, it will still be juicy and crispy. Have a happy thanksgiving everybody! Love you family, low you Lauren, love you mochi. Thanks Andi for motivating me to write this up (many people have been asking). Sorry Germany lost today :(.
-R

コメント